I recently put together a little tutorial on the Multiply Mode workflow for a friend who is currently learning digital painting.
Now I thought that maybe it wouldn't be a bad idea to publish it on here as well because it might be useful for some of you guys
A note in advance:
In principle you can use this setup for anything you want to do.
In my experience, however, it is best suited for individual characters.
It works decently well for larger illustrations, but it can also quickly get annoying because if you want to move parts around again, you have to adjust all of the layers.
However, you can still use this workflow to establish a basis for light and shadow relatively quickly and flatten everything down if you are satisfied with your results.
What is Multiply?
First, I should perhaps briefly clarify what Multiply Mode is and where it can be found.
So here goes:
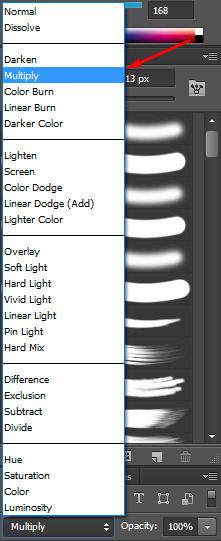
Multiply is a layer option in which the color information on the underlying layer is multiplied, as the name suggests. This means that the colors are darkened and also colored a little in the respective layer color (unless you have white as the layer color, then nothing happens). This means you can use it to paint shadows without actually changing the colors on the base layer.
That makes it possible to create additional color variants later by simply adjusting the basic colors (this is also referred to as a non-destructive workflow).

This is where you can find the setting
The setup
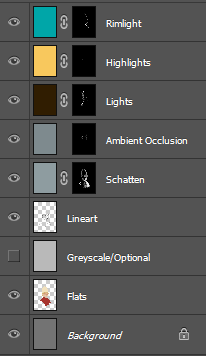
The setup for the Multiply Workflow is structured as follows (i.e. my setup that I work with from time to time - it can certainly be done differently and better):

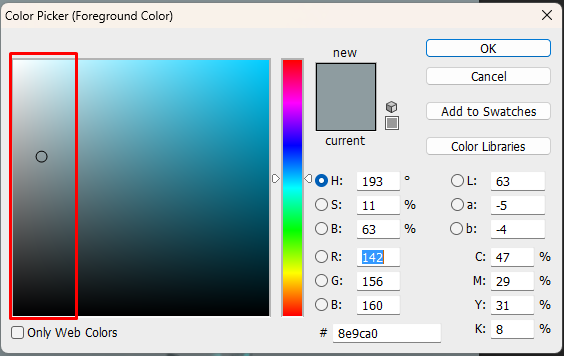
The lowest level contains the basic colors (flats). In my example I only have one layer but in most cases it makes sense to create each color on a separate layer. To do this you can simply mask the lineart and fill it completely on a new layer. You can then fill the base colors as clipping masks. This makes it even easier to change colors later. If you want, you can set up a layer for grayscale. This sometimes helps to better assess the distribution of the gray values. Above this is the drawing/lineart. At the end you can either delete this or color it in the respective area colors of the flats to make it disappear (if you want that, of course, if not you can also move it to the top) Then comes the first multiply level. You fill it completely with one color. You should make sure that the saturation is between 0-20%, otherwise the shadows will quickly become too dark. Between 10-20% you can also color the shadows a little (this is helpful if you want warmer or colder shadows). Between 0-10% results in neutral shadows.
Apart from that, the colors should be relatively close to the center of brightness and not be too bright or too dark.

Something in this area works best.
Then you add a layer mask to the layer and invert it (this is also a matter of taste, I think. I prefer to paint in the shadows rather than the light). You can then work on this layer mask later and paint the shadows (or the light if you don't want to invert) Then duplicate the layer and darken the shadow color a bit. This ensures that the shadows fit together in the end and the colors don't diverge too far. In my example I have named this layer Ambient Occlusion, but that is not 100% correct. I also use this layer simply to create darker shadows (the Terminator etc. e.g.) This is followed by three layers for lights, both of which are set to linear dodge. Also with layer mask. You just have to make sure that colors don't get too bright, otherwise the lights will burn out quickly. The Rimlight layer is also an optional layer. This is a concept art trick that helps objects quickly appear three-dimensional. This usually makes sense for individual objects or characters. In an illustration, you would then have to pay more attention to ensuring that the lighting conditions are correct. Of course, you could add more details and touch-ups above these levels, but this setup is usually enough.
Painting
All that follows is the painting itself. You just have to make sure that you paint on the layer mask and not on the layer itself (this happens more often than you think, as you can usually tell because nothing changes in the image).
You can also use the Mixer Brush on the layer mask.
That's what works best. So first block in the shadow and then go over the edges with the mixer brush to blur them a little (of course you still have to pay attention to the shape)
Thats it.

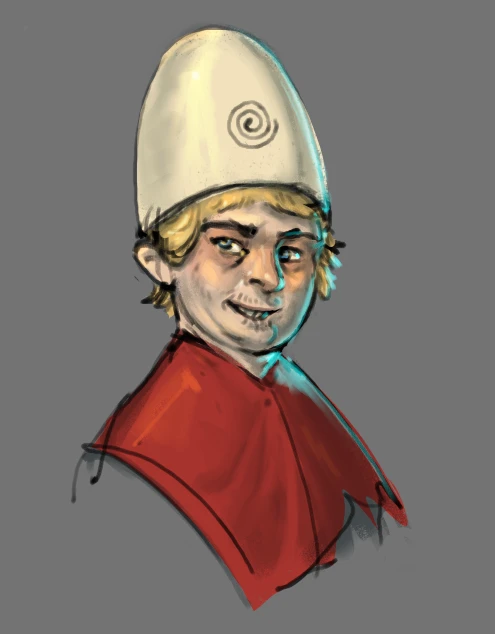
Mr.Egghat to show the end result :D
I hope that helps someone and if so do let me know
Best regards
Lucas / Zarbustibal
P.S.: The whole setup works in common graphics programs.
My example Pictures are from Photoshop but it also works in Paintstorm Studio, InfinitePainter and Clip Studio Paint.
In CSP, however, layer masks work a little differently. Instead of inverting them you have to empty them.
Otherwise the workflow stays the same.